Battery switch on travel trailer function is crucial for managing your RV’s power. Understanding how these switches work – whether manual, automatic, or a combination – is key to preventing dead batteries and protecting your valuable electronics. This guide will walk you through the different types of switches, their installation, troubleshooting common problems, and essential maintenance tips, ensuring you’re ready for any adventure on the road.
We’ll cover everything from the basic function of a battery switch in isolating your house battery from your vehicle battery to more advanced topics like selecting the correct amperage and understanding wiring diagrams. By the end, you’ll have the confidence to diagnose and fix common issues, keeping your travel trailer running smoothly.
Types of Battery Switches in Travel Trailers
Choosing the right battery switch for your travel trailer is crucial for managing your power sources effectively and preventing potential electrical issues. Different types of switches offer varying levels of convenience and control. Understanding their differences will help you make an informed decision based on your needs and budget.
Travel trailers typically use battery switches to isolate and manage power from different batteries (like your house battery and your starting battery for the tow vehicle). This prevents accidental draining of one battery by another and allows for selective charging and use.
Manual Battery Switches
Manual switches are the simplest and most common type. They’re essentially a physical switch that you flip to connect or disconnect the batteries. These switches are usually located inside the trailer, near the battery compartment.
Their simplicity translates to a low cost and ease of maintenance. However, you need to manually turn the switch on and off each time you want to use the house battery or charge it, making it less convenient than automatic options.
Automatic Battery Switches
Automatic battery switches offer a more hands-off approach. They automatically connect and disconnect the batteries based on voltage levels or other pre-programmed criteria. This eliminates the need for manual intervention, ensuring your house batteries are charged whenever your tow vehicle is running.
The convenience is a major advantage, but they’re generally more expensive than manual switches and can be more complex to troubleshoot if they malfunction. Some automatic switches also require more sophisticated wiring.
Combination Battery Switches
Combination switches offer the best of both worlds. They combine the functionality of both manual and automatic switches, giving you the option of manual control when needed and the convenience of automatic operation when desired.
So, you’re planning a trip? Awesome! Before you jet off, remember travel insurance is key. Check out this option for comprehensive coverage: aon travel insurance. It’s a good idea to compare plans, though, so you get the best fit for your needs. Another place to look for a policy is aon travel insurance , which often has different packages available.
Remember to read the fine print before committing to any policy! Happy travels!
This flexibility makes them a popular choice, but they tend to be the most expensive option. Understanding how to use both the manual and automatic functions is key to their effective use.
| Type | Advantages | Disadvantages | Typical Applications |
|---|---|---|---|
| Manual | Low cost, simple to use and maintain | Requires manual operation, inconvenient | Budget-conscious RVers, trailers with simple electrical systems |
| Automatic | Convenient, automatic operation, efficient charging | Higher cost, more complex wiring, potential for malfunctions | RVers who prioritize convenience, trailers with sophisticated electrical systems |
| Combination | Combines convenience and manual control, flexible operation | Highest cost, more complex operation | RVers who want both convenience and control, trailers with complex electrical demands |
Function and Purpose of a Battery Switch: Battery Switch On Travel Trailer Function

A battery switch in your travel trailer is a crucial component that controls the flow of power between your trailer’s house battery and your tow vehicle’s battery. It’s essentially a gatekeeper, ensuring that you’re using the right battery for the right purpose and preventing unwanted battery drain. Without it, you risk draining your house battery while driving or accidentally draining your vehicle’s battery while parked.The primary function of a battery switch is to isolate the house battery from the vehicle’s charging system and other electrical systems when not needed.
This prevents parasitic drain—a slow but steady depletion of your house battery’s charge even when your trailer isn’t in use. This is important because even small electronics left on can drain a battery over time, leaving you with a dead battery when you need it most. The switch also safeguards sensitive electronics within your travel trailer from voltage surges or power fluctuations that could occur if the two battery systems were improperly connected.
Battery Switch and Parasitic Drain Prevention
Parasitic drain is a common problem in RVs and travel trailers. Even small devices drawing a tiny amount of current can add up over time, especially when the trailer is not connected to shore power. A properly used battery switch prevents this by disconnecting the house battery from all circuits except those explicitly connected to a secondary power source.
So, you’re planning a trip? Awesome! Don’t forget travel insurance! Check out Aon travel insurance for comprehensive coverage options. They’ve got plans to fit various budgets and trip types. And if you’re particularly concerned about medical emergencies abroad, you might want to also look at Aon travel insurance specifically designed for health and medical needs while traveling.
Getting the right insurance is key to a worry-free adventure!
For example, a battery switch can isolate the refrigerator’s 12V system, preventing drain while you are driving. This ensures that your house battery retains its charge for when you need it most – for example, running your lights, water pump, or other appliances when you are parked at a campsite without shore power.
Managing Power from House and Vehicle Batteries
The battery switch allows you to selectively connect and disconnect your house battery from your vehicle’s charging system. When driving, you typically connect the house battery to the vehicle’s alternator, allowing it to recharge. This is often done using a combination of the battery switch and a charging relay. When parked, you disconnect the house battery to prevent draining the vehicle’s battery.
This control is vital for efficient battery management and ensures you have sufficient power for your appliances when you’re off-grid. It prevents scenarios where you might start your vehicle and find your house battery has completely drained.
Wiring and Installation of a Battery Switch
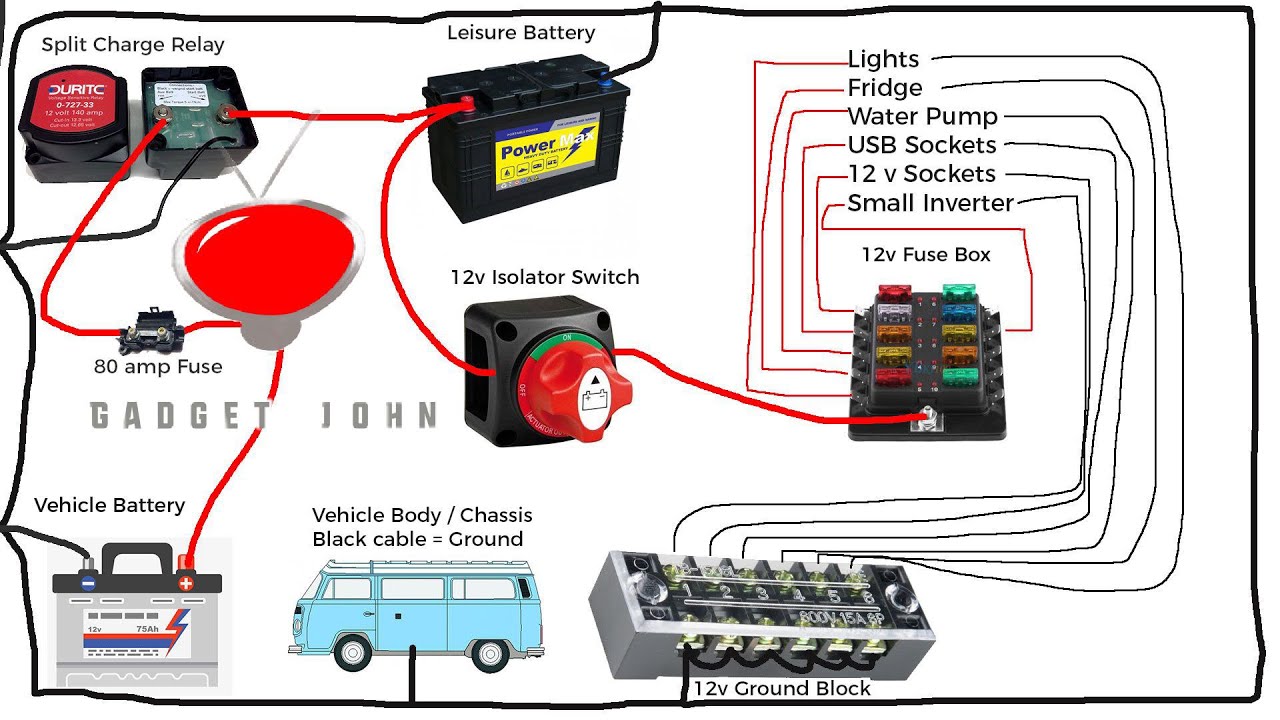
Installing a battery switch in your travel trailer is a crucial step in managing your power system. It allows you to isolate your house batteries from the tow vehicle’s charging system and other electrical components, preventing accidental discharge and enhancing safety. This section details the wiring, installation process, and common pitfalls to avoid.
Proper wiring is essential for the safe and effective operation of your battery switch. Using the correct gauge wire ensures sufficient current flow and prevents overheating, while following safety protocols protects you from electrical shock and potential damage to your RV’s electrical system.
Typical Wiring Diagram
Imagine your battery switch as a central hub. Let’s say you have two house batteries (Battery 1 and Battery 2) and a charging system (from your tow vehicle or solar panels). The positive (+) cable from each battery connects to a separate terminal on the battery switch. Similarly, the negative (-) cables from each battery connect to separate terminals on the switch.
A single positive (+) cable runs from the switch’s output terminal to your RV’s distribution panel. Finally, a single negative (-) cable runs directly from the batteries (often connected to a common negative bus bar) to the RV’s chassis ground. This creates a parallel system, allowing both batteries to supply power simultaneously when the switch is engaged.
This setup ensures that all the loads in your trailer draw power from the batteries, not directly from the charger. It also helps to prevent backfeeding from the charger into the batteries when not needed.
Wire Gauge Selection and Safety Considerations
Wire gauge selection depends on the amperage draw of your RV’s electrical system. Consult your RV’s wiring diagram or a qualified electrician to determine the appropriate gauge. As a general rule, thicker wires (lower gauge numbers) are needed for higher amperage. For example, using 4 gauge wire for a high-amperage system is safer than using 10 gauge wire.
Always use marine-grade wire rated for the expected amperage and temperature. This type of wire is designed to withstand the harsh conditions of a travel trailer environment. Additionally, all connections should be securely crimped with appropriate sized connectors and sealed with heat shrink tubing to prevent corrosion and short circuits. Always disconnect the negative (-) battery cable before performing any electrical work to prevent accidental shocks.
Wear appropriate safety glasses and gloves.
Step-by-Step Installation Procedure, Battery switch on travel trailer function
- Disconnect the batteries: Disconnect the negative (-) cables from both house batteries.
- Mount the switch: Choose a secure, dry location for the battery switch, preferably near the batteries but accessible for operation. Ensure adequate ventilation.
- Connect the positive cables: Connect the positive (+) cable from each battery to a separate terminal on the battery switch, using appropriately sized ring terminals and crimps. Ensure the connections are tight and secure.
- Connect the negative cables: Connect the negative (-) cables from each battery to a common negative bus bar or directly to the chassis ground. This should be done separately from the positive connection, ensuring a solid ground.
- Connect the output cables: Connect the positive (+) output cable from the switch to your RV’s distribution panel, using the appropriate gauge wire and connectors. Ensure that all wire connections are tightly crimped and sealed with heat shrink tubing.
- Reconnect the batteries: Reconnect the negative (-) cables to the batteries. Turn the switch on to verify functionality.
- Test the system: Test all appliances and systems to ensure they are functioning correctly. Check for any voltage drops or unusual heating.
Common Wiring Mistakes and How to Avoid Them
- Incorrect wire gauge: Using wire that’s too thin for the amperage can lead to overheating and fire hazards. Always use the correct gauge wire as specified by your RV’s electrical system requirements.
- Loose connections: Loose connections create resistance and can lead to overheating, voltage drops, and corrosion. Ensure all connections are tight and properly crimped.
- Improper grounding: A poor ground connection can lead to electrical shocks and malfunctioning appliances. Ensure a solid ground connection to the chassis.
- Incorrect polarity: Connecting wires with incorrect polarity can damage components and create a fire hazard. Double-check all connections to ensure correct polarity (+ and -).
- Lack of protection: Failing to use heat shrink tubing and proper sealing can lead to corrosion and short circuits. Always protect all connections.
Battery Switch Maintenance and Care
Keeping your travel trailer’s battery switch in top condition is crucial for reliable power and preventing costly repairs. Regular maintenance ensures your batteries are properly connected, protected from corrosion, and ready to provide power when you need it most. Neglecting this simple task can lead to significant problems, from a dead battery to a complete electrical system failure.Regular inspection and preventative maintenance will extend the lifespan of your battery switch and overall electrical system.
A small amount of time invested now will save you significant headaches and expenses down the road.
Battery Switch Inspection Schedule
A regular inspection schedule helps identify potential problems early, preventing them from escalating into major issues. A proactive approach to maintenance is key to a reliable system. Here’s a suggested schedule:
- Monthly Inspection: Visually inspect the switch for any signs of damage, loose connections, or corrosion. Check the surrounding wiring for any signs of wear or damage. This quick check can often reveal small issues before they become large problems.
- Semi-Annual Inspection (Every 6 Months): More thorough inspection. This should include tightening all connections, cleaning battery terminals and switch contacts, and checking the switch’s operation. Pay close attention to the integrity of the switch mechanism itself.
- Annual Inspection: A comprehensive check of the entire system. This might involve testing the switch’s functionality with a multimeter to ensure proper operation. Consider having a qualified technician inspect the switch and associated wiring if you’re uncomfortable performing these checks yourself.
Preventative Maintenance Tasks
Preventative maintenance is the best way to ensure your battery switch remains reliable and long-lasting. These tasks are straightforward and can be completed with basic tools.
- Tighten Connections: Loose connections can lead to poor electrical contact, overheating, and corrosion. Regularly tighten all terminals and connections using the appropriate wrench. Don’t overtighten, as this can damage the terminals.
- Clean Battery Terminals and Switch Contacts: Corrosion is a common problem that can severely impede electrical flow. Use a wire brush or terminal cleaner to remove corrosion from both the battery terminals and the switch contacts. Apply a corrosion inhibitor to protect against future corrosion. For stubborn corrosion, a baking soda and water paste can be effective.
- Inspect Wiring: Check the wiring for any signs of fraying, damage, or loose connections. Repair or replace any damaged wiring immediately. Properly insulated and secured wiring prevents shorts and fire hazards.
- Lubricate Moving Parts (if applicable): Some battery switches have moving parts, such as a lever or switch mechanism. Applying a small amount of dielectric grease to these parts can improve their operation and prevent seizing.
Importance of Clean Battery Terminals
Clean battery terminals are essential for optimal performance and safety. Corrosion acts as an insulator, preventing proper electrical flow and potentially leading to a voltage drop. This can result in poor performance of your appliances, difficulty starting your engine, and even potential fire hazards due to overheating. Regular cleaning prevents these problems and ensures your electrical system operates at peak efficiency.
The build-up of corrosion can also weaken the connection, leading to eventual terminal failure.
Mastering your travel trailer’s battery switch is a simple yet powerful step towards worry-free RVing. From understanding the various switch types and their applications to tackling troubleshooting and maintenance, you now possess the knowledge to keep your power system humming. Regular checks, proper installation, and knowing when to seek professional help will ensure many years of reliable power on your adventures.
FAQ Overview
What happens if my battery switch fails?
A failed battery switch can lead to a complete loss of power, preventing you from using appliances or starting your trailer. You might also experience unexpected battery drain.
How often should I check my battery switch?
Inspect your battery switch at least once a month, checking for corrosion, loose connections, and proper operation.
Can I install a battery switch myself?
While possible, installing a battery switch requires basic electrical knowledge and working with potentially hazardous voltages. If unsure, consult a professional.
What size wire should I use for my battery switch?
The appropriate wire gauge depends on the amperage rating of your battery switch and the length of the wiring run. Consult a wiring chart for the correct gauge.
